How to Build a Full Stack MERN App (Node/React)
June 15, 2020
This tutorial is meant to help you create a basic working full-stack application using React and Node.
Before we get started, make sure you have Node JS installed on your computer.
If you would like to host your application on the web, you will need to sign up for or be signed up for:
- Github (code repository)
- Netlify (frontend host)
- MongoDB Atlas (database hosting)
- Heroku (backend host)
Each of these services has a free tier which will be sufficient to get the application live in production.
Folder structure
There are numerous ways we could setup our application. In this tutorial, we will be
hosting the frontend (client) and backend (server) separately.
To get started, create a folder with your project name
mkdir fullstack-appBackend Setup (Node)
Our backend will be a Node.js application. First, we will create a folder and then
initialize the app. Enter the following in your terminal
mkdir backend
cd backend
npm init -y
The command npm init -y will create a file named package.json. This file will keep
track of our dependencies , scripts, configurations, etc.
In the backend directory create the following folders and files
config/
- keys_dev.js
- keys_prod.js
- keys.js
models/
- Book.js
routes/
- api/
- - books.js
.gitignore
index.js
Dependencies
Dependencies are 3rd party javascript code that we can use to simplify our development process. We can add our dependencies with
npm install --save express cors mongoose body-parserthen
npm install --save-dev nodemonIn our first command, we added normal dependencies, noted by the optional --save flag.
These dependencies are necessary code to serve our node application in production.
The second command uses the --save-dev flag, denoting it as a developer dependency.
These types of packages are not included the production application, but are useful when
developing.
Scripts
Scripts are commands that we can enter in the terminal to interact with our application.
These will mostly be used to start or test the application. Include a server and a start script and a in your package.json file now like so
{
  "scripts": {
    "server": "nodemon index.js",
    "start": "node index.js"
  },
}
Run this script for development by entering npm run server when in the backend folder. The start script will work as well, though it is mostly for production and Heroku.
Your package.json file should now look include the following:
"scripts": {
  "server": "nodemon index.js",
  "start": "node index.js"
},
"dependencies": {
  "body-parser": "^1.19.0",
  "cors": "^2.8.5",
  "express": "^4.17.1",
  "mongoose": "^5.8.11"
},
"devDependencies": {
  "nodemon": "^2.0.2"
}
Server
In the backend folder, next create a file called index.js. This file will be the one
that is run initially when you call the start script using npm run server. This code
will not change very much between projects, though it is useful to understand what each
line does. Include the following in your index.js file
const express = require('express')
const cors = require('cors')
const mongoose = require('mongoose')
const bodyParser = require('body-parser')

// imports the API from the routes/api folder
const books = require('./routes/api/books')

// initializes the express application
const app = express()

// sets up CORS for Cross-Origin-Resource-Sharing
app.use(cors())
// converts API responses to JSON for easy use
app.use(bodyParser.urlencoded({extended: false}))
app.use(bodyParser.json())

// imports our database credentials (stored separately for security)
const db = require('./config/keys').mongoURI

// initializes our database using the credentials
mongoose.set('useFindAndModify', false)
mongoose
  .connect(db, () => {}, {useNewUrlParser: true})
  .then(() => console.log('Mongo Database connected'))
  .catch(err => console.log(err))

// creates a route where we can interact with our API
app.use('/api/books', books)

// sets the port number depending if we are in production or development
const port = process.env.PORT || 5000

// intializes the server and logs a message
server = app.listen(port, () => console.log(`Server running on port ${port}`))
For this tutorial, we will have only 1 API endpoint at /api/books. This means that when
we visit our server at http://localhost:5000/api/books we will be able to access the
routes we will soon create. If you wish to make additional routes, you should import and
add them here just like we did with books.
Database credentials
Once you have signed up for a free mongodb account, copy the connection string for
your application.
Add the following to keys.js
if (process.env.NODE_ENV === 'production') {
  module.exports = require('./keys_prod')
} else {
  module.exports = require('./keys_dev')
}
We referenced this file in the index.js above to get our database credentials. If we
are in development, this file will call keys_dev.js whereas if we have hosted our
application (production) it will call keys_prod.js.
Add the following to keys_prod.js for when we host our Heroku application later
module.exports = {
  mongoURI: process.env.MONGO_URI,
  secretOrKey: process.env.SECRET_OR_KEY,
}
In keys_dev.js you will paste your connection string from mongodb atlas
module.exports = {
  mongoURI: 'mongodb+srv://paste-your-connection-string-here',
  secretOrKey: 'secret',
}
Your connection string will not include your password, but instead have <pass> which you
must replace with your user password.
This file must not be commited to github, or anywhere publically visible. To avoid this,
we will immediately add the following to the .gitignore file in our project directory
config/keys_dev.js
node_modules/
When we later commit our project to github, this file will instruct git not to include the file with our database credentials or our third party dependency code.
Database Models
In order to interact with mongoDB, we must first tell it the structure of the data we want
to be working with. Each entry into our database will have a title, author, and
description all which will be required fields. If we want to save new details about our
books such as year published, or an image URL, we will have to add it here. In
/models/Book.js add the following
const mongoose = require('mongoose')
const Schema = mongoose.Schema

const BookSchema = new Schema({
  title: {
    type: String,
    required: true,
  },
  author: {
    type: String,
    required: true,
  },
  description: {
    type: String,
    required: true,
  },
})

module.exports = Book = mongoose.model('book', BookSchema)
API Routes
Lastly for our server to get up and running we will need to create our API. This is an
applied programming interface, or a recipe for the things we can get/post to our database.
Add the following to books.js in /routes/api
const express = require('express')
const router = express.Router()

const Book = require('../../models/Book')

router.get('/test', (req, res) => res.json({msg: 'backend works'}))

// @route GET /api/books
// @desc Get books (public)
router.get('/', (req, res) => {
  Book.find()
    .then(info => res.json(info))
    .catch(err => res.status(404).json({msg: 'no books found'}))
})

// @route POST /api/books
// @desc Create new book (public)
router.post('/', (req, res) => {
  const newBook = new Book({
    title: req.body.title,
    author: req.body.author,
    description: req.body.description,
  })

  newBook.save().then(info => res.json(info))
})

// @route DELETE /api/books
// @desc Delete book (public)
router.delete('/', (req, res) => {
  Book.findOneAndRemove({_id: req.body.id}).then(() => {
    res.json({success: true})
  })
})

// @route UPDATE /api/books/update/:id
// @desc Update book (public)
router.post('/update/:id', (req, res) => {
  Book.findOneAndUpdate(
    {_id: req.params.id},
    {
      $set: {
        title: req.body.title,
        author: req.body.author,
        description: req.body.description,
      },
    },
    {new: true},
  )
    .then(info => {
      res.json(info)
    })
    .catch(err => res.status(400).json({msg: 'update failed'}))
})

module.exports = router
This file contains the majority of our server logic. Here we can decide what happens when
we visit each of the defined endpoints. This file contains a test route along with
routes to Create, Read, Update, and Delete books in our database.
Each endpoint includes the HTTP method to use, the specific route to use it on, and
how to interact with the database when that route is accessed. req stands for request
and has data passed along from the client while res stands for response and specifies
which information will be passed back to the client. Book refers to the mongoose data
model we setup previously.
It is useful to understand this code, as it can be easily used as building blocks for
setting up different endpoints.
Testing the server
Now that our server code is complete we can start the server by navigating to the
backend folder and entering the command npm run server. If the server was setup
without error, you should see the string Mongo Database connected that we included in
our index.js file.
Open your browser and navigate to http://localhost:5000/api/books/test to access our
test route and ensure that your server is working properly.
The next step is to create a frontend application to communicate with our server.
Frontend Setup (React)
For this tutorial, we will be using create-react-app to setup the frontend of the
application. create-react-app is a build tool for react applications to get up and
running quickly. In the root of your project folder, enter the command
npx create-react-app frontendnpx will grab the latest version of create-react-app from the web and bootstrap a new
react project in a folder named frontend or whatever we specify.
Change directories into your frontend folder and you will notice that lots of files were
built out automatically. The src folder contains our code, and package.json contains
our scripts and packages (similar to our server).
Package.json
We will be using the package axios to simplify our API requests, however you also use
the native fetch API if you are familiar with it’s syntax. Install axios by entering
npm install --save axiosAdditionally, we will need to add a proxy to this package.json file to let our client
app know what port our server is running on. proxy will be a separate entry in our
package file and you can include it like this
  "dependencies": {
    ...
  },
  "proxy": "http://localhost:5000",
  "scripts": {
    ...
  },
It doesn’t matter where in the package.json file you include the proxy, only that the
syntax is correct JSON and the address it points to is where your server is running.
Adding Styling (CSS)
Now that our server is running and our frontend is configured, the rest of the code will
go in App.js and App.css. I have included some predefined styles to this application
so that we can focus on the API setup. Feel free to use your own stylesheets if you
prefer, or else copy the following into App.css
* {
  margin: 0;
  padding: 0;
  box-sizing: border-box;
}
h2,
label {
  color: #f5c518;
}
.App {
  background-color: #000;
  color: white;
  min-height: 100vh;
  width: 100vw;
  padding: 40px 0;
  font-size: 18px;
}
form {
  display: flex;
  flex-direction: column;
}
form label {
  margin-bottom: 4px;
}
form input {
  background-color: rgb(34, 34, 34);
  border: 1px solid rgb(67, 67, 67);
  outline: none;
  height: 24px;
  color: white;
  margin-bottom: 8px;
  padding: 4px;
  border-radius: 2px;
}
button {
  background-color: rgb(49, 49, 49);
  color: rgb(87, 153, 239);
  border: 1px solid rgb(67, 67, 67);
  border-radius: 2px;
  outline: none;
  cursor: pointer;
}
form button {
  height: 20px;
  padding: 0 4px;
  margin: 4px auto 0 auto;
}
button:hover {
  background-color: rgb(69, 69, 69);
}
.DataInput {
  width: 500px;
  margin: 0 auto;
  border: 1px solid rgb(82, 82, 82);
  padding: 20px;
  border-radius: 2px;
}
.DataInput h2 {
  text-decoration: underline;
  margin-bottom: 20px;
}
.DataInput button {
  margin-top: 12px;
}
.DataOutput {
  width: 500px;
  margin: 0 auto;
  border: 1px solid rgb(82, 82, 82);
  padding: 20px;
  border-radius: 2px;
  margin-top: 20px;
}
.DataOutput__card {
  border: 1px solid rgb(24, 24, 24);
  margin-bottom: 12px;
  display: flex;
  justify-content: space-between;
  min-height: 150px;
  padding: 20px;
  overflow: hidden;
}
.DataOutput__card--details {
  padding-right: 20px;
}
.DataOutput__card--details div {
  display: flex;
}
.DataOutput__card--details div:not(:last-child) {
  margin-bottom: 11px;
}
.DataOutput__card span {
  color: #f5c518;
  min-width: 110px;
}
.DataOutput__card--options {
  display: flex;
  justify-content: space-between;
  height: 20px;
}
.DataOutput__card--options button {
  padding: 0 4px;
}
.DataOutput__card--options button:not(:last-child) {
  margin-right: 18px;
}
.DataOutput__editing {
  border: 1px solid rgb(24, 24, 24);
  margin-bottom: 12px;
  display: flex;
  justify-content: space-between;
  background-color: rgb(24, 24, 24);
}
.DataOutput__editing form {
  padding: 20px;
}
.DataOutput__editing--option {
  display: flex;
}
.DataOutput__editing--option label {
  min-width: 110px;
}
.DataOutput__editing--option input {
  width: 300px;
}
.DataOutput__editing--cancel {
  margin-left: 20px;
}
Building the App component
create-react-app can change slighly version-to-version. To make sure we’re on the same
page start with the following in App.js
import React, {useEffect, useState} from 'react'
import axios from 'axios'
import './App.css'

function App() {
  return (
    <div className="App">
      <div className="DataInput"></div>
      <div className="DataOutput"></div>
    </div>
  )
}
export default App
We will be using using a functional component and hooks in this application. At the
top we imported the useEffect and useState hooks along with the axios package.
We can eventually refactor this application into multiple files, but for simplicity’s
sake we will include all of our frontend logic in this App.js component.
Our clientside application will include the following:
useStateto store book logicuseEffectto retrieve book data initially- CRUD Methods (Create/Read/Update/Delete)
- Data Input component
- Data Output component
UseState and UseEffect Hooks
These hooks work similarly to this.setState and componentDidMount methods if you’ve
ever written class-based React before. Add the following hooks to the top of our app
component before the return statement
...
function App() {
  const [books, setBooks] = useState([]);
  const [editing, setEditing] = useState(null);

  useEffect(() => {
    getBooks();
  }, []);

return (
...
)
Here we will be saving the books our application is aware of in books with a default
empty array. editing will store the id of the book we are editing details of.
The useEffect hook causes a function to run whenever the application gets rendered or rerendered.
Setting the second argument to an empty array will only trigger this function to run on
the first render, similar to componentDidMount. Once we write the getBooks method,
this will retrieve our book data from the database.
Create and Read Methods
Next we can get our application working by adding the Create and Read Methods, along
with some JSX. Add the following methods below our useEffect hook and before the
return statement
// Create
const onSubmitBook = async e => {
  e.preventDefault()
  const {title, author, description} = e.target
  await axios.post('/api/books', {
    title: title.value,
    author: author.value,
    description: description.value,
  })
  title.value = ''
  author.value = ''
  description.value = ''
  getBooks()
}

// Read
const getBooks = async () => {
  const res = await axios.get('/api/books')
  const data = res.data
  setBooks(data)
}
The first method will get called when our DataInput form is submitted. It will grab the
title, author, and descrtipion values from the form inputs, and send that data off
to the server as a post request using axios. Once the request is sent off, the
fields will be reset to add another book, and our getBooks method will be called again
to read our newly input book.
The getBooks method will use a get request to our books route returning an array of
all of our book data. Once the array is retrieved, it will be set to our books variable
using the setBooks method we defined earlier.
In order to use these methods we will also need to add some markup to our component. In
the return method include the following input and output data.
return (
<div className="App">
<div className="DataInput">
<h2>Enter book:</h2>
<form onSubmit={e => onSubmitBook(e)}>
<label htmlFor="title">Title:</label>
<input type="text" name="title" />
<label htmlFor="author">Author:</label>
<input type="text" name="author" />
<label htmlFor="description">Description:</label>
<input type="text" name="description" />
<button>Add Book</button>
</form>
</div>
<div className="DataOutput">
{books.map(book => (
<div key={book._id}>{book.title}</div>
))}
</div>
</div>
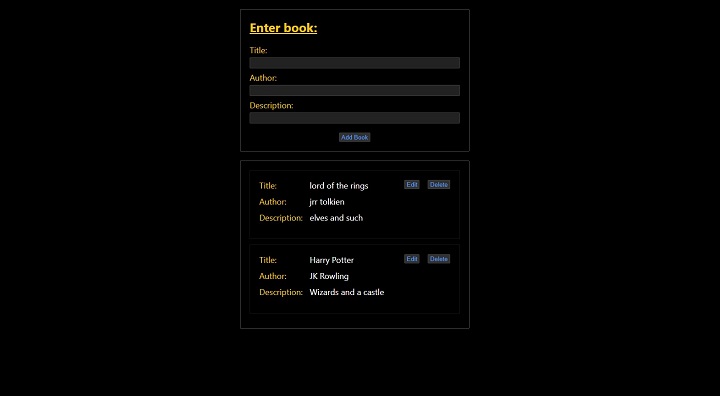
)With this DataInput form added we can now input book details into our database. As long
as the three fields are not empty, a new book will be added to to the /api/books route
when the Add Book button is clicked.
The DataOutput above is a simplified version of what we will be building out, and it
current displays the title of whatever books we have added to and retrieved from our
database.
Update and Delete
So far we have added the Create and Read methods for our clientside application. Next
we can add the Update and Delete Methods below them on our app.js component
// Update
const onSubmitEdits = async (e, id) => {
  e.preventDefault()
  const {title, author, description} = e.target
  await axios.post(`/api/books/update/${id}`, {
    title: title.value,
    author: author.value,
    description: description.value,
  })
  setEditing(null)
  getBooks()
}

// Delete
const deleteBook = async bookToDelete => {
  await axios({
    method: 'DELETE',
    url: '/api/books/',
    data: {
      id: bookToDelete,
    },
  })
  await getBooks()
}
The Update method behaves similarly to the Create method, pulling data from a form
submission and posting it to the database. The only main difference is that our form will
be located in our DataOuput section in order to modifiy an existing book. We passed the
id into this method to specify which book that is, and will also reset our editing
value once the edits are submitted.
The Delete method passes along the id of the book we wish to delete to our server.
This will remove the book from our array located at /api/books.
You’ll notice that each of our Create, Update and Delete methods call the getBooks
method once they are complete. This will update our UI whenever a change is made in real
time.
Lastly, we can finish up our application by modifying the DataOuput div that we included
above. Replace those 5 lines with our complete output
<div className="DataOutput">
  {books.map(book => (
    <div key={book._id}>
      {editing !== book._id ? (
        <div key={book._id} className="DataOutput__card">
          <div className="DataOutput__card--details">
            <div>
              <span>Title:</span>
              {book.title}
            </div>
            <div>
              <span>Author:</span>
              {book.author}
            </div>
            <div>
              <span>Description:</span>
              {book.description}
            </div>
          </div>
          <div className="DataOutput__card--options">
            <button onClick={() => setEditing(book._id)}>Edit</button>
            <button onClick={() => deleteBook(book._id)}>Delete</button>
          </div>
        </div>
      ) : (
        <div key={book._id} className="DataOutput__editing">
          <form onSubmit={e => onSubmitEdits(e, book._id)}>
            <div className="DataOutput__editing--option">
              <label htmlFor="title">Title:</label>
              <input type="text" name="title" defaultValue={book.title} />
            </div>
            <div className="DataOutput__editing--option">
              <label htmlFor="author">Author:</label>
              <input type="text" name="author" defaultValue={book.author} />
            </div>
            <div className="DataOutput__editing--option">
              <label htmlFor="description">Description:</label>
              <input type="text" name="description" defaultValue={book.description} />
            </div>
            <div>
              <button type="Submit">Submit</button>
              <button
                className="DataOutput__editing--cancel"
                onClick={() => setEditing(null)}
              >
                Cancel
              </button>
            </div>
          </form>
        </div>
      )}
    </div>
  ))}
</div>
As mentioned above, you can certainly refactor this DataOuput section into multiple
components. In this case, we are reading and mapping over the books data that we
retrieved from our database. By default, books will have an Edit button to open a
editing form, and Delete button to delete that book. If a book is being edited, our
application will instead display a form to input the new, edited data. Edits can be
cancelled clicking the Cancel button, or submitted with the Submit button.
If all went well, we now have a working fullstack application 🎉! This should serve
as a good stepping stone to building more complicated APIs and UIs. It certainly helps
to have an idea of what functionality you want your application to take on, and to
practice by building various Node and React applications.
Hosting
Now that we have a serverside Node application running on port 5000 and a clientside
React application on port 3000. We can make some final steps to get them hosted on the
web.
For our Node application we will use free hosting on Heroku and our React
application will be hosted for free on Netlify.
Backend Hosting (Heroku)
Once you have signed up for a free Heroku account, change directories back into your
backend application. In order to host this application and (hopefully) avoid issues,
Heroku prefers us to specify which version of Node we are running in the
package.json file. In order to find your version of node type
node -vDepending on which version you are running, add a JSON entry for "engines" to your
package file specifying your node version. Also add a comma after your previous entry to
make sure the JSON is valid
"devDependencies": {
  ...
},
"engines": {
  "node": "10.15.1"
}
Deploy
Enter the following commands to commit your files to git so that Heroku can access the
code
git init
git add .
git commit -m "initial commit"
Now login to Heroku and create a new application
heroku login
heroku create
The first command will open Heroku in the browser to login, and the next command will
initialize an application with a randomly generated name for us.
Heroku Credentials
Before we deploy our files, we will need to add our database credentials to the Heroku
application we just created. Find the newly generated app in Heroku and navigate to
Settings. Clicking Reveal Config Variables will allow us to input the values located
in our ./config/keys_dev.js file.
Input the values for MONGO_URI and SECRET_OR_KEY in heroku, making sure to use the
upper-cased versions to indicate environmental variables that Heroku will read.
  MONGO_URI       mongodb+srv://<username>:<password>...
  SECRET_OR_KEY   secret
Once you have input the credentials into the Heroku settings, enter the command
git push heroku masterin your terminal.
This will build out your node application and deploy it to the url provided by Heroku.
This is the url where you application will live. Test it out with your /api/books/test
route by visiting your heroku-app
https://enigmatic-castle-69673.herokuapp.com/api/books/test- Note: Using the free tier of Heroku will only spin-up your application when it is in
use. This can take about 5 seconds if it hasn’t been visited in the last 30 minutes. You
can run this application 24/7 using the basic paid tier of Heroku at around $7/month by
changing the
Dyno Typeunder theResourcespanel.
Frontend Hosting (Netlify)
Setup
Now that we have our server hosted online, we can have our frontend routes point to that
url, rather than using the proxy we setup for development. In your frontend package.json
file, remove the proxy line we included earlier.
Next, add the primary url of your heroku app to the beginning of each of your 4 endpoints in app.js.
Instead of the shortened versions, these will look similar to
const res = await axios.get('https://enigmatic-castle-69673.herokuapp.com/api/books')Once you have added the application base URL to each endpoint like in the above example, we are ready to deploy
the frontend application. You can test the frontout out with npm start or
proceed to deployment.
Deploy to Github / Netlify
In this step we will be using Github and Netlify to setup and deploy a repository for
our frontend code. Login to Github and create a new repository with whatever name you
like.
Github will provide you with a git address and commands to upload your code. Follow the
steps indicated on the next page which will be similar to
git init
git add .
git commit -m "initial commit"
git remote add origin <git@github.com:your-github-username/repo-name.git>
git push -u origin master
Make sure to the git remote line with your own remote from Github.
These commands, input separately will initialize a new git repo, add all files to the
staging area, commit them to git, set the git remote to your new repository, and then push
the application code to github.
Once this step is complete, login to Netlify and select New site from Git. You will
next have the option to login to Github and select your new repository that was just
created.
Netlify will automatically scan your application for the build command and publish
directory. These will pretty much always be correct if you are using create-react-app to
setup the project, so click Deploy site and wait for your fullstack application to be
hosted live on the web!